
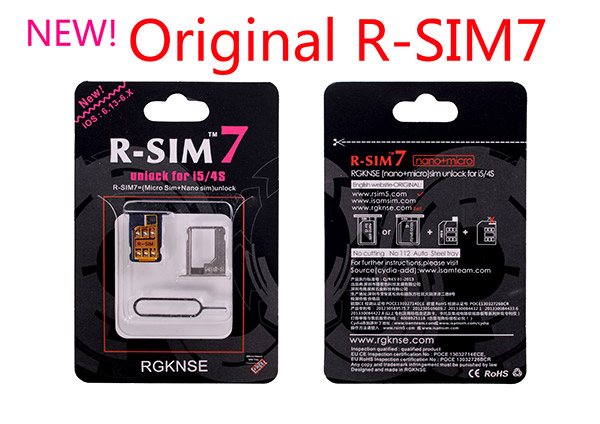
R-SIM Unlock For iPhone 6S/6/5S/5/4S GSM
/CDMA Unlocking
How to Use & How to Unlock & How to Activate & How to unlock country Network o lock
As we all know, R-SIM7+ is the only team in the world topush the Iphone5/4 s general accelerated default edition off,and we have our own invention and patentwhich is general unlock card tray. afterthe R - SIM7 listed , the lock machinemarket is rapid booming on the global scale. compare withrsim7, which have huge superiority, now we Introducing Speed Accelerated Edition SAMSIM Unlock Card :
1.Signal speed within 10-15 seconds unlocking Iphone4S and 5
2.With the Activation card that can guideyou and active any of your cell phone and Operators.the more steady,the less activate for nothing.
3.Add more default version (any verson is available,easy operate and speed Signal pace )
4.To update circuit board makes the sim card insert Relaxed.
5..TO increase accessories {sim card tray for iphone5 and micro sim adapter}
6.New circuit board and card tray,easy identification for iphone ,perfect work.
7. mostimportant,Specifically designed, directly built IC in card tray ,which really realize the unlock dream.
R-Sim7 +Unlocking and Activation Card is compatible with latest iPhone 5 and 4s firmware iOS 6.0 and iOS 6.0.1 any baseband both CDMA, GSM & CDMA supports 3G SIM cards and Networks.
There is No jailbreak requirement.. No Dongle, No IMEI Request, No Code
All you need to do is to insert R-Sim7 card into your iPhone device, go to Settings > Phone > SIM Application and configure the options that includes selecting the network that you want to connect.
After that, a restart is required in order to complete the process.
If you are trying to use R-Sim with the CDMA based Verizon/Sprint/Japan AU models, you need to install an auxiliary patch.
This Patch will fix CDMA iOS6.0.1 bugs and also will fix 3G SIM cards problem in some countries. This patch is embedded on APN file that you can install without Jailbreak, No Dongle or hack is required.. JUST TYPE
The United States Sprint/Verizon version and Japan AU version iPhone5 unlocking special tips:
The United States Sprint/Verizon version and Japanese AU version iPhone5, Use RSIM unlocking, please enter the iPhone5 >>settings>>General>>Network:open all network switch, including (data roaming, CDMA data roaming), can be fast search to signal and carrier name!
The United States Sprint version and Japan AU version selection operator after the jump activation solution:
Enter the RSIM manual editing mode, "other carriers", input IMSI:Sprint (3101200 ) AU ( 4405000), Send,Accept,restart your phone, OK
Because 6.0/6.01 cannot jailbreak and setting APN, cannot connect network solutions:
If your system is IOS6.0, please first update to 6.01,iPhone using wireless WIFI connected to the network, and then in the iPhone browser to open "www.isamsim.com/cdma3g"or"www.rsim5.com/cdma3g",will show Install Profile window,click"install"and click"Done", restart iPhone,your iPhone network settings in cellular data all switch is opened, it can connect to the internet!
R-SIM7+ Operation Instructions


R-SIM 9 PRO / 9 GOLD / 9+ Instructions
Configuring your R-SIM 9 is easy. Please follow this instructions:
1 – With the original SIM – Disable Mobile Data
2 – Remove SIM Original Card
2 – Reset Network Settings (it will also remove Wi-Fi passwords you might have saved)
3 – Reboot the phone
4 – Insert SIM with R-SIM
5 – Follow on screen instructions (you must select the network the phone is locked to – not the network you want to use and SIM card type)
6 – Reboot phone
7 – Click cancel on the On Screen instructions as it will remember the last configuration you just did)
8 – Wait until the phone activates and get network
- If the phone does not activate or if the original Network is not on the List, you must choose to enter its IMSI code manually (you can find a list of IMSI codes here: http://goo.gl/KXYn0i)
- If the phone activates but it does not get network, it meens configuration is done properly but you are using a USIM (128K SIM CARD) and a patch is needed.
Notes:
- If you miss configure the card, inserting a new SIM card will start the configuration process again.
- If using a iPhone5 – in some cases you must select iOS 7.0.X on the configuration (if you using above iOS 8)
- If using a USIM and the phone activates normally but does not get network, you will need the RPATCH. The link ishttp://rpatch.geveystore.com

RSIM11+ mainly added new LTE 4G function which gives perfect unlocking as an unlocked phone. Unlocking LTE 4G doesn’t require selecting operators, but considering other functions, we suggest choosing corresponding operators.
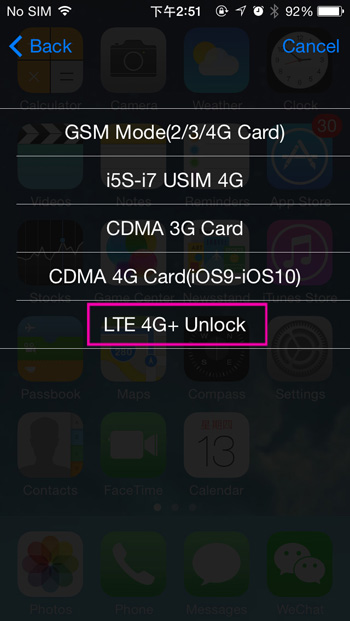
After operator selected, choose LTE 4G+Unlock in the pop-up.

LET 4G+Unlock unlocking: insert sim card->Select activate by cellular network (or WIFI)->Waiting for unlocking->Unlocking succeeded->4G perfectly unlocked
Other functions are the same with RSIM11 as below
Mobile phone system requires IOS10 for better unlocking of China Mobile and China Unicom 4G SIM cards
1、STK Menu, select operator

4: when there's no you choose type pop-up operators list, click the first option "Other carrier" into the manual input the code model, (common operators see the code behind the code table), manual 7 digital input operator code and click on "send" (less than 7 digits plus 00.), then click "accept", restart iPhone can restart, about 5~10 seconds, appear magical signal!


5:RSIM9 PRO intelligent program operation (when you choose the wrong operator or the need to set the default operator), click the iPhone "Settings - phone -SIM card application" displays the following RSIM menu:


